2.3. reStructuredText简明教程
简要介绍 reStructuredText 的概念, 语法等.
2.3.1. What is reStructuredText
reStructuredText 官网说 reStructuredText 是 Docutils (Documentation Utilities) 标记语法和解析器组件 ( Markup Syntax and Parser Component of Docutils ).
Docutils 项目的主要是为了创造一套将纯文本转换为一些常用格式的工具, 这些常用格式包括:HTML、XML和LaTeX.
reStructuredText是一个易读, 易写, 所见即所得的明文标记语法和解析系统, 对于 “in-line” 程序文档 (如 Python docstrings) 非常有用, 用于快速创建简单的网页和本地文档. reStructuredText是专为特定应用领域的扩展而设计, 其解析器是Docutils的一个组件. reStructuredText是轻量级标记系统 StructuredText 和 Setext 的修订和重解释版本.
reStructuredText的主要目的是定义和实现一个用于Python文档和其他文档域的 标记语法 , 要求是 可读的 和 简单的 , 同时 足够胜任非凡的任务 . 标记的目的是能够将reStructuredText文档转换成有用的结构化数据格式.
上面是对下面这段话的翻译:
reStructuredText is an easy-to-read, what-you-see-is-what-you-get plaintext markup syntax and parser system. It is useful for in-line program documentation (such as Python docstrings), for quickly creating simple web pages, and for standalone documents. reStructuredText is designed for extensibility for specific application domains. The reStructuredText parser is a component of Docutils. reStructuredText is a revision and reinterpretation of the StructuredText and Setext lightweight markup systems.
The primary goal of reStructuredText is to define and implement a markup syntax for use in Python docstrings and other documentation domains, that is readable and simple, yet powerful enough for non-trivial use. The intended purpose of the markup is the conversion of reStructuredText documents into useful structured data formats.
就这些吧! 如果你现在就想尝试, 可以在线试一试: http://rst.ninjs.org/.
Warning
“reStructuredText” is ONE word, not two!, 以下可能会简写成 reST.
2.3.2. Why reStructuredText
我不想再多说了, 简要列举一下吧:
专注于文本内容而不是排版样式
兼容所有文本编辑器与字处理软件
渲染导出格式丰富, 如HTML、PDF, 借助一些工具还可以导出Latex、epub等文件
可以使用Git等版本控制系统管理文章版本
可读、直观、易学
2.3.3. reST环境搭建
正如前面所说, 你可以在线试一试: http://rst.ninjs.org/, 也可以去下载一些相关工具, 可以参考 这里 , 如 Docutils , Sphinx , 当然你也可以参照我的博客: 超级文本编辑器Sublime Text3 来安装Sublime Text并配置reStructuredText环境, 不过我下面会讲到.
如果你想使用 Sphinx 请移步 Sphinx简明教程 , 下面介绍 Sublime Text 下环境的配置.
2.3.3.1. Sublime Text及其安装
用过 Notepad++ 的童鞋都可能会对其爱不释手, 但如果你基本掌握了 Sublime Text (以下会简称为”ST”), 你应该会有一种相见恨晚的感觉!
Sublime Text is a sophisticated text editor for code, markup and prose. You’ll love the slick user interface, extraordinary features and amazing performance.
如作者自己对ST的定位, ST是一个高雅且精良的 文本编辑器 , 由程序员Jon Skinner于2008年1月份所开发出来, 可以访问`Sublime Text主页 <http://www.sublimetext.com/>`_ 查看效果展示.
Sublime Text具有漂亮的用户界面和强大的功能, 例如代码缩略图, Python的插件, 代码段等. 还可自定义键绑定, 菜单和工具栏. Sublime Text 的主要功能包括:拼写检查, 书签, 完整的 Python API , Goto 功能, 即时项目切换, 多选择, 多窗口等等.
Sublime Text支持三大主流操作系统: Windows, Linux, OS X. 几乎你需要的功能都有, 一切可修改(快捷键、插件包etc.), 界面优美, 可惜的是不开源, 不过即使不注册也可以使用, 功能不受限. Lime Text 是其开源版的一种实现, 我还没打算用这个.
See also
如果你在使用ST的过程中遇到了一些问题, 可以先访问本人博客 超级文本编辑器Sublime Text3, 也许有你要的答案.
2.3.3.1.1. Sublime Text的安装
对于Windows系统, 其实是不需要安装的, 是的, 你没听错, 请访问 ST下载页面 , 并选择 便携版 (portable version), 然后解压后双击 sublime_text.exe 当然, 你也可以选择安装版, 不过我会选择便携版, 因为这样复制到其它机器上就照常用了.
对于Linux系统, 可以访问 ST下载页面 下载安装, 对于Ubuntu系统, 直接双击下载的 deb 包, 然后到软件中心单击 安装. 当然, 可以通过命令安装: sudo dpkg -i <package.deb> , 安装完成后, 终端输入: subl 即可启动ST3.
2.3.3.1.2. ST中插件包的安装
在ST中可以配置各种代码编辑器环境, 一般通过安装ST的插件包来实现, Package Control 是ST的插件包管理器, 访问 Package Control 查看插件包, 插件包的安装方式一般有如下两种.
下载并解压安装包
到 Package Control 或 GitHub 搜索并下载插件包, 然后解压到ST根目录即可.
对于Windows, 请解压至
Sublime Text3 x64/Data/Packages目录下对于Linux系统, 解压至
~/.config/sublime-text-3/Packages下
然后, 重启ST即可.
通过Package Control安装管理包
首先需要给ST安装 Package Control 包管理器插件.
安装方法很简单, 可以参见官网:https://packagecontrol.io/installation#st3, 也可以看下面的介绍.
通过 View --> Show Console 打开打开控制台, 粘贴如下代码并回车安装
For ST3:
import urllib.request,os,hashlib; h = '2915d1851351e5ee549c20394736b442' + '8bc59f460fa1548d1514676163dafc88'; pf = 'Package Control.sublime-package'; ipp = sublime.installed_packages_path(); urllib.request.install_opener( urllib.request.build_opener( urllib.request.ProxyHandler()) ); by = urllib.request.urlopen( 'http://packagecontrol.io/' + pf.replace(' ', '%20')).read(); dh = hashlib.sha256(by).hexdigest(); print('Error validating download (got %s instead of %s), please try manual install' % (dh, h)) if dh != h else open(os.path.join( ipp, pf), 'wb' ).write(by)
For ST2:
import urllib2,os,hashlib; h = '2915d1851351e5ee549c20394736b442' + '8bc59f460fa1548d1514676163dafc88'; pf = 'Package Control.sublime-package'; ipp = sublime.installed_packages_path(); os.makedirs( ipp ) if not os.path.exists(ipp) else None; urllib2.install_opener( urllib2.build_opener( urllib2.ProxyHandler()) ); by = urllib2.urlopen( 'http://packagecontrol.io/' + pf.replace(' ', '%20')).read(); dh = hashlib.sha256(by).hexdigest(); open( os.path.join( ipp, pf), 'wb' ).write(by) if dh == h else None; print('Error validating download (got %s instead of %s), please try manual install' % (dh, h) if dh != h else 'Please restart Sublime Text to finish installation')
然后, 通过 Package Control 安装插件包.
使用 Ctrl + Shift + P 打开PackageControl, 如果没有输入 package 就出现了, 选择 Install Package , 如下图
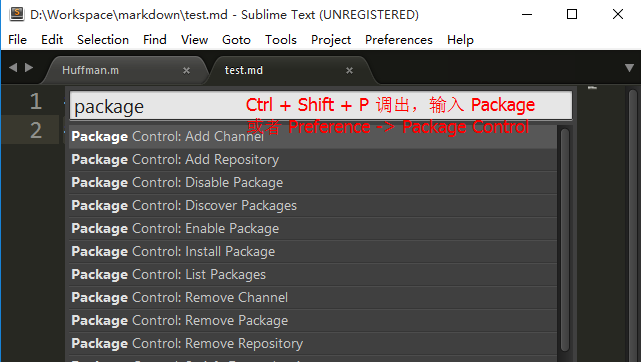
接着在弹出的窗口中输入 插件包的名字 选择安装即可.
2.3.3.1.3. 配置reST环境
给ST安装以下插件包:
OmniMarkupPreviewer , 也可以到 这里 下载, (用于解析渲染reST等多种标记语法, 必选 ), 安装好后, 按快捷键
Ctrl + Alt + O预览.reStructuredText Improved (用于语法着色, 可选 , 建议安装 )
sublime-rst-completion ,(用于自动补全, 可选, 但推荐安装 ), 在制表时很有用, 请点击链接查看.
2.3.4. reST语法简介
请访问 Quick reStructuredText 查看快速参考, 页面给出了示例代码及效果的对比显示, 非常易学, 见下图:

也可以参考以下手册:
sphinx_rtd_theme的文档中使用了reStructuredText的大量语法, 可以从 这里 下载其文档源码来学习相关指令.
下面进行基本语法介绍.
Note
OmniMarkupPreviewer 有时预览效果不好, 可以使用它做个大致预览, 然后可以使用其它工具如Sphinx. 此外, Sphinx对reST进行了一些扩展, 请参考Sphinx手册.
2.3.4.1. 章节 (Section Structure)
章节头部 ( 参考 ) 由下线(也可有上线)和包含标点的标题 组合创建, 其中下线要至少等于标准文本的长度, 如:
======
Title
======

Subtitle1
---------

SubSubtitle
+++++++++++

Subtitle2
-----------
通常没有专门的符号表示标题的等级, 但是对于Python 文档, 可以使用如下约定:
#下划线及上划线表示 部分*下划线及上划线表示 章节=下划线表示 小章节-下划线表示 子章节^下划线表示 子章节的子章节"下划线表示 段落
在Markdown中, 用 # , * 的多少来代表标题等级, 如:
# Title
## Subtitle1
### SubSubtitle
## Subtitle2
2.3.4.2. 段落 (Paragraphs)
段落由空白行分割, 且应左对齐, 与Markdown相同; 在reST中, 缩进的段落意味着引用, 这在Markdown中是通过标记符号 > 实现的.
如:
这是第一段

这是第二段
这个还是第二段
被渲染成:
这是第一段
这是第二段 这个还是第二段
2.3.4.3. 行内标记 (Inline Markup)
reST文本 |
解析渲染结果 |
注解 |
|---|---|---|
|
emphasis |
通常渲染成斜体, 与Markdown相同 |
|
emphasis |
通常渲染成粗体, 与Markdown相同 |
|
interpreted text |
强调解释. |
|
|
常用于行内代码, 与Markdown相同 |
A |
A xxx |
下标(subscript) |
A |
A xxx |
上标(superscript) |
|
Action |
GUI labels |
|
Ctrl+Shift |
Key-bindings |
|
菜单选择 |
Warning
对于行内标记, 标记前后要留有至少一个空格. 如 你好*我没变斜*你好 –> 你好*我没变斜*你好, 正确为: 你好 *我变斜了* 你好 –> 你好 我变斜了 你好, 或 你好\ *我变斜了*\ 你好 –> 你好我变斜了你好.
2.3.4.4. 列表 (Lists)
无序列表使用 ``-`` , ``*`` , ``+`` 来标记:

- 无序列表第一项
- 无序列表第二项

有序列表使用 ``num.`` 来标记:

1. 有序列表第一项
2. 有序列表第二项

自动编号列表必须使用 ``#.`` 来标记:

#. 自动编号的列表第一项
#. 自动编号的列表第二项

这是一个定义列表:

term
    术语定义必须缩进

    可以包含多个段落

next term
    术语描述

下面是一个嵌套列表, 每一级别向右缩进一次, 同级别缩进应相同:

1. 有序列表第一项
    * 无序列表第一项
    * 无序列表第二项
#. 有序列表第二项
    + 无序列表第一项
    + 无序列表第二项
将被渲染成:
无序列表使用 - , * , + 来标记:
无序列表第一项
无序列表第二项
有序列表使用 num. 来标记:
有序列表第一项
有序列表第二项
自动编号列表必须使用 #. 来标记:
自动编号的列表第一项
自动编号的列表第二项
这是一个定义列表:
- term
术语定义必须缩进
可以包含多个段落
- next term
术语描述
下面是一个嵌套列表, 每一级别向右缩进一次, 同级别缩进应相同:
- 有序列表第一项
无序列表第一项
无序列表第二项
- 自动编号列表第二项
无序列表第一项
无序列表第二项
2.3.4.5. 源代码 (Source Code)
标记符号 :: 紧接一空白行, 然后紧跟代码, 整个代码文本块必须缩进 (同所有的段落一样, 使用空白行和周围文本完成分隔), 如:
::

    some codes
    some codes
    some codes

没有缩进, 这里不是代码, 是正常段落!
将被渲染成:
some codes
some codes
some codes
没有缩进, 这里不是代码, 是正常段落!
此外, 高级的代码高亮功能可是使用 .. code-block:: , 举例:
.. code-block:: python
   :caption: Code Blocks can have captions.
   :linenos:
   :emphasize-lines: 3,5

   def some_function():
       interesting = False
       print 'This line is highlighted.'
       print 'This one is not...'
       print '...but this one is.'
被渲染成:
1def some_function():
2    interesting = False
3    print 'This line is highlighted.'
4    print 'This one is not...'
5    print '...but this one is.'
2.3.4.7. 表格 (Tables)
支持三种表格, 参见 docutils tables. 一种是 网格表格 , 可以自定义表格的边框. 如下标记代码:
.. table:: Grid Table Demo
   :name: table-gridtable

   +------------------------+----------+----------+----------+
   | Header row, column 1   | Header 2 | Header 3 | Header 4 |
   | (header rows optional) |          |          |          |
   +========================+==========+==========+==========+
   | body row 1, column 1   | column 2 | column 3 | column 4 |
   +------------------------+----------+----------+----------+
   | body row 2             | ...      | ...      |          |
   +------------------------+----------+----------+----------+


可以使用 :ref:`table-gridtable` 引用, 在Sphinx中还可以使用 :table:numref:`table-gridtable` 来引用.
将被渲染成:
Header row, column 1 (header rows optional) |
Header 2 |
Header 3 |
Header 4 |
|---|---|---|---|
body row 1, column 1 |
column 2 |
column 3 |
column 4 |
body row 2 |
… |
… |
可以使用 Grid Table Demo 引用, 在Sphinx中还可以使用 表 2.3.1 来引用.
简单表格 书写简单, 但有一些限制: 需要有多行, 且第一列元素不能分行显示, 如下:
=====  =====  =======
A      B      A and B
=====  =====  =======
False  False  False
True   False  False
False  True   False
True   True   True
=====  =====  =======
将被渲染成:
A |
B |
A and B |
|---|---|---|
False |
False |
False |
True |
False |
False |
False |
True |
False |
True |
True |
True |
CSV表格:
.. csv-table:: Frozen Delights!
   :header: "Treat", "Quantity", "Description"
   :widths: 15, 10, 30

   "Albatross", 2.99, "On a stick!"
   "Crunchy Frog", 1.49, "If we took the bones out, it wouldn't be
   crunchy, now would it?"
   "Gannet Ripple", 1.99, "On a stick!"
被渲染为
Treat |
Quantity |
Description |
|---|---|---|
Albatross |
2.99 |
On a stick! |
Crunchy Frog |
1.49 |
If we took the bones out, it wouldn’t be crunchy, now would it? |
Gannet Ripple |
1.99 |
On a stick! |
Tip
如果你使用”Restructured Text (RST) Snippets”, 即 sublime-rst-completion , 那么表格的制作将变得极为简单, 如下, 更多内容参考 sublime-rst-completion :
There is a particular magic expansion for tables. Here is how it works:
创建表格提纲, 用一个或多个空格分割列:
This is paragraph text *before* the table.

Column 1  Column 2
Foo  Put two (or more) spaces as a field separator.
Bar  Even very very long lines like these are fine, as long as you do not put in line endings here.

This is paragraph text *after* the table.
把光标放在要转化成表格的内容里
按下
Ctrl + T, Enter(Linux or Windows) orSuper + Shift + T, Enter(Mac). 将会自动格式化成表格:This is paragraph text *before* the table. +----------+---------------------------------------------------------+ | Column 1 | Column 2 | +==========+=========================================================+ | Foo | Put two (or more) spaces as a field separator. | +----------+---------------------------------------------------------+ | Bar | Even very very long lines like these are fine, as long | | | as you do not put in line endings here. | +----------+---------------------------------------------------------+ This is paragraph text *after* the table.
现在假设你想增加某一单元格内容:
+----------+---------------------------------------------------------+
| Column 1 | Column 2                                                |
+==========+=========================================================+
| Foo is longer now     | Put two (or more) spaces as a field separator.          |
+----------+---------------------------------------------------------+
| Bar      | Even very very long lines like these are fine, as long  |
|          | as you do not put in line endings here.                 |
+----------+---------------------------------------------------------+
按下同样的快捷键, 表格结构会自动调整:
+-------------------+--------------------------------------------------------+
| Column 1          | Column 2                                               |
+===================+========================================================+
| Foo is longer now | Put two (or more) spaces as a field separator.         |
+-------------------+--------------------------------------------------------+
| Bar               | Even very very long lines like these are fine, as long |
|                   | as you do not put in line endings here.                |
+-------------------+--------------------------------------------------------+
2.3.4.8. 直接标记 (Explicit Markup)
直接标记用于处理reST中的特殊内容, 如脚注, 高亮段落, 注释以及通用指令.
直接标记的标记符号是: 顶格的两个句点紧跟一个空格 .. , 其后会紧跟直接标记对象, 如 .. NOTE:: some notes 将对应一个注解, .. image:: imagepath 对应一幅图像, 会被渲染成 imagepath 所表示的图像.
如果紧跟的是普通文本, 相当于代码注释或者叫评论, 如 .. some comments 则不会渲染显示, 又如:
.. 这是一个注释, 你只能在源码中看到我, 我不会被渲染出来.
渲染结果:
可以通过缩进产生多行注释:
..
   这整个缩进块都是
   一个注释.
   你只能在源码中看到我们, 我们不会被渲染出来

   仍是一个评论.

你可以看到我, 我不是注释.
渲染结果:
你可以看到我, 我不是注释.
Note
下面涉及的很多语法, 都和直接标记 ``.. `` 有关, 如脚注, 引文, 超链接, 指令, 注释等等.
2.3.4.9. 指令 (Directives)
官方文档的描述是:
Directives are indicated by an explicit markup start (“.. “) followed by the directive type, two colons, and whitespace (together called the “directive marker”). Directive types are case-insensitive single words (alphanumerics plus isolated internal hyphens, underscores, plus signs, colons, and periods; no whitespace). Two colons are used after the directive type for these reasons:
即指令由 直接标记 + 指令类型 + 两个冒号 + 空格(多余0个) 组成指令标记 (“directive marker”), 指令类型是大小写不敏感的单个单词 (字母数字加内连字符、下划线、加号, 冒号, 句点;不含空格). 关于为什么使用两个冒号, 可以参考官方文档 Directives .
指令 是reST 的又一个扩展机制, Sphinx 大量使用了指令, 支持的指令很多, 这里仅介绍常用的几个, 请自行查阅手册:
See also
Sphinx 中的 reST 教程中的 指令 部分: http://www.sphinx-doc.org/en/stable/rest.html#directives .
2.3.4.9.1. 数学
数学公式指令 math
支持LaTex数学语法, 以及公式引用 (通过 :eq:`x x x` 引用), 如我是下面的带标签公式 Eq.2.3.2 , 示例:
行内公式 :math:`\alpha > \beta` :

Display 公式:

.. math::

    n_{\mathrm{offset}} = \sum_{k=0}^{N-1} s_k n_k

带标签公式:

.. math::
   :label: This is a label

    n_{\mathrm{offset}} = \sum_{k=0}^{N-1} s_k n_k

多行公式:

.. math::

   (a + b)^2 = a^2 + 2ab + b^2

   (a - b)^2 = a^2 - 2ab + b^2

对齐多行公式:

.. math::

   (a + b)^2  &=  (a + b)(a + b) \\
              &=  a^2 + 2ab + b^2
将被渲染成:
行内公式 \(\alpha > \beta\) :
Display 公式:
(2.3.1)¶\[n_{\mathrm{offset}} = \sum_{k=0}^{N-1} s_k n_k\]带标签公式:
(2.3.2)¶\[n_{\mathrm{offset}} = \sum_{k=0}^{N-1} s_k n_k\]多行公式:
(2.3.3)¶\[(a + b)^2 = a^2 + 2ab + b^2 (a - b)^2 = a^2 - 2ab + b^2\]对齐多行公式:
(2.3.4)¶\[(a + b)^2 &= (a + b)(a + b) \\ &= a^2 + 2ab + b^2\]
Hint
当使用MathJax对数学公式渲染时, 可能不能达到预期效果, 请参考 Sphinx数学支持 ;
关于Sphinx中的如何使用Katex渲染公式, 参见 Sphinx数学支持 .
关于Sphinx中的如何使用定义定理等环境, 参见 sphinxcontrib-proof ;
See also
更多内容参考reST手册, 这里 . 关于Sphinx中对数学公式的支持部分, 请参考 Math support in Sphinx . 或 Sphinx数学支持 .
2.3.4.9.2. 图像
图像指令
image
即通过 .. image:: imagepath 实现插入图像:
.. image:: picture.jpeg
   :height: 100px
   :width: 200 px
   :scale: 50 %
   :alt: 对于不能显示图片的时候, 显示这些文字
   :align: right
下面通过 .. image:: ../_static/figs/mkdocs/insertimage.png 插入一幅图像:

图像指令
figure, 包含图例和标题, 可以像下面这样使用:.. figure:: picture.png :scale: 50 % :alt: map to buried treasure This is the caption of the figure (a simple paragraph). The legend consists of all elements after the caption. In this case, the legend consists of this paragraph
下面通过如下命令插入一幅图像:
.. figure:: ../_static/figs/mkdocs/insertfigure.png
   :width: 1024
   :scale: 50%
   :align: center

   大唐芙蓉园 - This is the caption of the figure (a simple paragraph).

    The legend consists of all elements after the caption.  In this
    case, the legend consists of this paragraph.

图 2.3.1 大唐芙蓉园 - This is the caption of the figure (a simple paragraph).
The legend consists of all elements after the caption. In this case, the legend consists of this paragraph.
Tip
在Markdown中, 插入图片很简单,  即可.
2.3.4.9.3. 提示警告类
有很多: tip, note, hint, danger, error, warning, caution, attention , important
reST 标记代码:
.. tip:: This is a tip

.. note:: This is a note

.. hint:: This is a hint

.. danger:: This is a danger

.. error:: This is an error

.. warning:: This is a warning

.. caution:: This is a caution

.. attention:: This is an attention

.. important:: This is an important

.. seealso:: This is seealso
被渲染成:
Tip
This is a tip
Note
This is a note
Hint
This is a hint
Danger
This is a danger
Error
This is an error
Warning
This is a warning
Caution
This is a caution
Attention
This is an attention
Important
This is an important
See also
This is seealso
2.3.4.9.4. 主题
reST 标记代码::
.. topic:: Topic Title

    Subsequent indented lines comprise
    the body of the topic, and are
    interpreted as body elements.
被渲染成
Topic Title
Subsequent indented lines comprise the body of the topic, and are interpreted as body elements.
2.3.4.9.5. 额外的主体元素
contents <table-of-contents>(本地, 仅是当前文件的内容表格)
container(自定义容器, 用来生成HTML的<div>)
rubric(和文档章节无关的标题)
topic(高亮显示的主体元素)
parsed-literal(支持内联标记的斜体模块)
epigraph(可选属性行的摘要模块)
highlights(有自己的类属性的摘要模块)
compound( 复合段落)
2.3.4.9.6. 专用表格
table(有标题的表格)
csv-table(CSV自动生成表格)
list-table(列表生成的表格)
2.3.4.9.7. 专用指令
raw(包含原始格式的标记)include(包含reStructuredText标记的文件)– 在Sphinx中,如果包含绝对文件路径, 指令会以源目录地址做为参照
class(将类属性指派给下一个元素)
2.3.4.9.8. HTML 特性
meta(生成HTML<meta>标签)title(覆盖文档标题)
影响标记:
default-role(设置新的默认角色)role(创建新的角色)
Sphinx 新增指令可查阅 Sphinx Markup Constructs .
2.3.4.10. 超链接 (Hyperlinks)
2.3.4.10.1. 外部链接
使用 `Link text <http://example.com/>`_ 来表示超链接, 将被渲染成 Link text 如果文字本身就是链接, 那不用作任何标记, 解析器可以自动将链接和邮箱地址转换为超链接.
也可以单独定义链接目标用引用:
This is a paragraph that contains `a link`_.

.. _a link: http://example.com/
渲染成:
This is a paragraph that contains a link.
Tip
在Markdown中, 插入链接很简单, [Link Text](http://example.com/) 即可.
2.3.4.10.2. 内部链接
首先需要在标题, 图像, 表等对象前放置一个标签
.. _label:, 比如我在上幅图上方放置了一个标签figure-datangfurongyuan, 注意空白行:.. _figure-datangfurongyuan: .. figure:: ../_static/figs/mkdocs/insertfigure.png ...
引用. 通过
:ref:`label`, 接上例, 使用:ref:`figure-datangfurongyuan`引用, 那么渲染结果为: 大唐芙蓉园 - This is the caption of the figure (a simple paragraph)., 点击会跳到图像位置.
其它的交叉引用, 请参考手册 交叉引用部分,
2.3.4.11. 脚注 (Footnotes)
包含两步:
在文档底部放置脚注主体, 以
rubric指令标示:.. rubric:: Footnotes .. [#name] 这里是脚注内容
在需要插入脚注的地方插入脚注名
[#name]
其中, 使用 [#name]_ 可以实现自动编号, 当然你也可以使用数字来指示确定的脚注编号 [1]_ .
举例:
我后面插入了一个自编号的脚注 [#f1]_ , 后面又跟了一个手动编号的脚注 [2]_ , 后面还跟着一个自动编号的 [#fn]_ .

.. rubric:: Footnotes

.. [#f1] 我是自编号脚注1
.. [2] 我是手动编号脚注2
.. [#fn] 我是自编号脚注3
我后面插入了一个自编号的脚注 1 , 后面又跟了一个手动编号的脚注 2 , 后面还跟着一个自动编号的 3 .
Footnotes
2.3.4.12. 引文 (Citations)
Sphinx支持标准的 reST 引文, 此外, 在Sphinx里, 所有的引文都是全局的, 所有文件都能引用任意的文献, 像下面这样使用引文:
Lorem ipsum [Ref]_ dolor sit amet.

.. [Ref] Book or article reference, URL or whatever.
Lorem ipsum [Ref] dolor sit amet.
- Ref
Book or article reference, URL or whatever.
引文的用法与脚注用法相似, 但标签不是数字, 也不是以 # 开头.
Hint
关于Sphinx中如何使用 bibtex 参考文献, 请参考 sphinxcontrib-bibtex 小结.
2.3.4.13. 替换 (Substitutions)
reST 支持替换, 你可以像下面这样使用替换:
首先定义替换操作:
.. |name| replace:: 替换文本
或者:
.. |caution| image:: warning.png
             :alt: Warning!
然后在需要替换的地方使用 |name| , 或者 |caution|
示例1:
reST源码:
你看到了吗? 第二个单词 word |word| !

.. |word| replace:: 替换成我了
被渲染成:
你看到了吗? 第二个单词 word 替换成我了!
示例2
"大唐芙蓉园-婚纱照"本来是个短语, 使用 |大唐芙蓉园-婚纱照| 会被替换成图像!

.. |大唐芙蓉园-婚纱照| image:: ../_static/figs/mkdocs/insertfigure.png
                       :alt: 大唐芙蓉园-婚纱照!
被渲染成:
“大唐芙蓉园-婚纱照”本来是个短语, 使用 会被替换成图像!
你可以进行任意的替换!
2.3.4.14. Sphinx扩展指令
有关Sphinx的扩展指令, 如 目录树 , 术语 , 特定语法着色 等, 请移步本手册 Sphinx重要扩展介绍 指南, 或参考Sphinx官方手册 The TOC tree 部分.